If you use WordPress as your blogging platform, you are aware of the thousands of plugins available to enhance the functionality and performance of your site.
A must-have plugin from the wide variety at your disposal is Jetpack. In this post, I’m going to show you how to get the best out of Jetpack and why you should install it if you haven’t already.
What Is Jetpack for WordPress?

Jetpack is a WordPress plugin that makes WordPress work for you as efficiently as possible in most functions. It’s developed by Automattic the company behind WordPress meaning it is 100 percent optimized and won’t hinder your site’s performance in any way.
How to Install Jetpack on WordPress
The installation process is simple since Jetpack is readily available in the WordPress plugin repository. Here’s how to go about it:
- On your WordPress Dashboard, go to Plugins
- Click on Add New
- Type the word ‘Jetpack’ on the Search plugins bar and press ENTER on your keyboard
- Install and activate the first result (Jetpack – WP Security, Backup, Speed, & Growth)
- You’re all set for the next step
How to Setup Jetpack for WordPress for the First Time
The setup process for Jetpack is simple and will take you just a couple of minutes. Here’s what you need to do:
- Immediately after activation, you’ll be directed to a setup page
- On this page, tap on the blue Setup Jetpack button
- Sign up for a Jetpack account using your preferred email
- Once your account is ready, you’ll be directed to a Pricing page
- Don’t worry, you can choose the Jetpack Free option at the bottom of the pricing options
- Click the green Start for free button
- The resulting setup wizard gives you some recommendations that you should select according to the purpose of the site—skip anything that requires payment
- Make sure you enable Downtime Monitoring when prompted by the wizard
- You can Enable Related Posts if you’re using a free theme that doesn’t offer the option
- Enable Site Accelerator which will slightly improve your site performance
- Jetpack is now set up and your blog performance will receive a noticeable improvement, especially with speed
More Jetpack Tweaks to Improve Your Blog’s Performance
There’s more you can do with Jetpack besides improving your site’s speed. I’ll guide you through what you can do to ensure you get the best out of every extra feature that the free version of the Jetpack plugin offers.
First, you have to go to the WordPress dashboard and tap on the Jetpack option, it should be among the first few options.
1. Traffic Stats

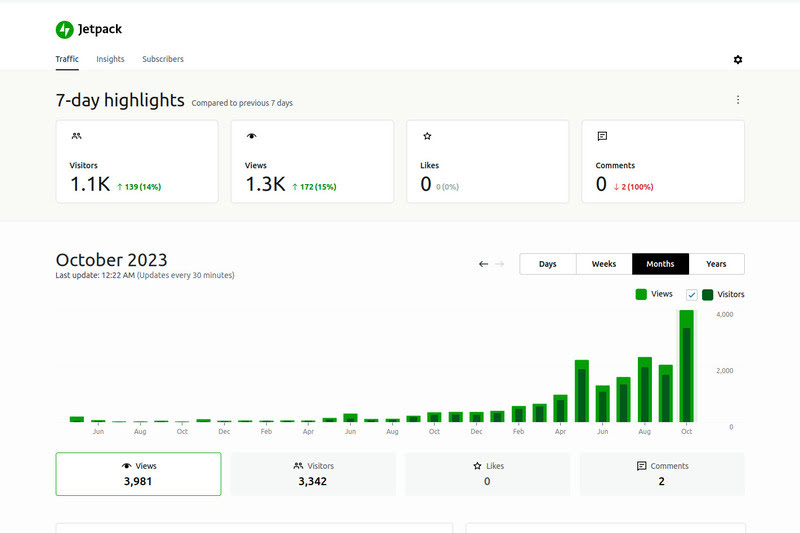
The first thing you’ll see on Jetpack’s dashboard is your site’s traffic numbers. You can click on View detailed stats or go to wordpress.com to get more about your traffic numbers e.g. visitor count, session duration, page views, etc.
2. Security
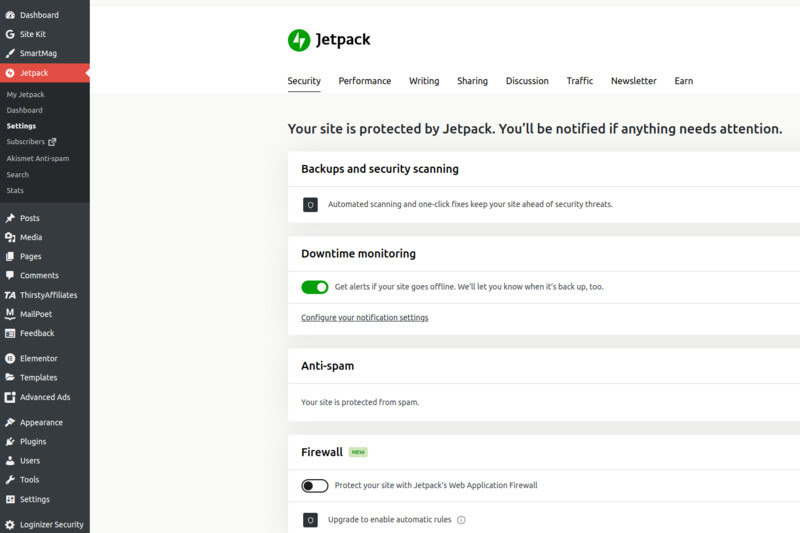
At the top of the Jetpack dashboard, click on settings to tweak different features. The first feature you’ll find is Security. There are three settings you can toggle on to improve the security of your site:
- Downtime monitoring – Sends you a notification if your site is inaccessible to your visitors or is down for whatever reason.
- Brute force protection – Prevents hackers or robots from attempting to hijack your site.
- WordPress.com login – This allows you to log into your site using your WordPress account and also adds the option of using two-factor authentication to add a layer of security to prevent unauthorized access.
3. Boost Performance
With this feature, you can tweak how your site handles media which are the most resource-intensive elements of any website. You can turn on the following settings:
- Site accelerator – This feature optimizes images and all Javascript and CSS files to give your site an extra speed boost.
- Lazy loading – Under site accelerator, you can also enable image lazy loading to ensure images are loaded only when the visitor reaches them giving priority to the relevant content.
4. Enhance Your Written Content
There’s not much you can do with written content apart from playing around with font types, colors, and size. But with Jetpack, you can enhance the reading experience by simply toggling on a few buttons. Here are some of the things you can do with Jetpack in this regard:
- Image carousels – Turning on this feature enhances the user experience by displaying a smooth full-screen gallery in case you want to showcase several images to your readers simultaneously.
- Extra composition features – You can easily enable features like copying all elements of a post at once, writing in plain-text Markdown syntax, writing math equations/formulas, and using shortcodes to embed media from a variety of sites.
- Custom content types – Jetpack will provide you with an awesome pre-made portfolio, and testimonial templates. To get them simply toggle on the switch beside the two options.
- Extra widgets – If you turn this feature on, you can get additional great-looking widgets like Twitter streams, Spotify embeds, YouTube embeds, and email subscription forms, among many others that I cannot list here.
- Email posting – Turning this feature on will generate an email address where you can send posts through email if for some reason you can’t access your WordPress dashboard.
5. Social Sharing
Utilizing the features in this setting goes a long way in supercharging your social media promotion campaigns. The features that you can utilize include:
- Publicize connections – This feature allows you to automatically share your posts to all social media platforms that you use. Jetpack allows you to easily connect to popular social media sites by typing in your username and authorizing access to your accounts.
- Sharing buttons – Turning this feature on will add buttons on your posts and pages to allow your readers to easily share your content with others. Comes in handy if your theme doesn’t offer this feature.
- WordPress Like button – Turning the Like button on will allow readers on wordpress.com to show their love for your posts or pages.
6. Comments and Subscriptions
Making commenting and subscription easier on your blog will go a long way in increasing reader engagement. Jetpack does exactly that with the following features:
- Comments – Here, you can give your readers the option to use existing Facebook, Google, Twitter, and WordPress accounts to leave their comments. This feature eliminates the need to type in their details resulting in faster commenting. You can even enable comment likes among other small tweaks to make the commenting experience better.
- Subscriptions – This feature works like magic especially if you need to ensure your readers engage with you or other readers. Turning it on will give them an option to receive follow-up comments in their emails. Most importantly, they can opt-in to receive new blog posts directly in their email without you having to do a thing.
7. Site Visibility and Traffic
The available features in this section will come in handy if you’re new to blogging and can’t figure out how to optimize your site for visibility. Here’s what you can do:
- Show related posts – This feature allows you to show related posts with a thumbnail after each post. A useful feature if you’re using a free theme. It’ll make your blog look professional without the need to invest in a premium WordPress theme.
- Search engine optimization – With this feature, Jetpack will allow you to customize how your site looks in search engines. For instance, it lets you add a meta description that you’d want people to see if they come across your site on Google or any other search engine including your posts on social media.
- Short links – The WP.me Short Links feature will generate shortened links when you or your readers are sharing posts or pages from your blog.
- Sitemaps – Another great feature for beginners. Turning it will let Jetpack regularly generate updated sitemaps and automatically submit them to search engines for you.
- Site verification – Jetpack also provides a section where you can paste the HTML tag code provided by various webmasters like Google, Bing, Yandex, Facebook, and Pinterest.
Do You Really Need Jetpack for WordPress?

Yes! I highly recommend this plugin to be among the first that bloggers should install on their site as soon as they launch. All these features work quite well and Jetpack will not only improve your site’s speed and performance but also make it look more professional without you having to spend a dime.
I found out about Jetpack a couple of months after starting my first blog and after understanding how it works, I made many drastic changes to the site. First, I got rid of Yoast and some image optimization plugins that I was using.
Also, if you intend to use the WordPress mobile app, Jetpack makes it possible to access your blog from the app. If you have multiple WordPress sites, you can install Jetpack on each one of them to have control in one location.
All your sites will show up on WordPress.com and on the mobile app eliminating the need of having to log in to each of your sites.
More Plugins From Automattic
One of the reasons I like using WordPress is the flexibility it provides with the thousands of plugins available for site owners. However, I prefer plugins from Automattic in whatever case they’re available.
Automattic is the creator of WordPress and the plugins they develop work seamlessly without hampering your site’s performance. Here’s a quick list of some of their plugins that I use that you can also try if you haven’t already:
- Akismet – Keeping out spam comments can be quite a task but this plugin does a perfect job even if you automatically approve comments on your blog.
- Crowdsignal – If you intend to do or are already doing polls, surveys, or ratings on your site, Crowdsignal should be your go-to plugin.
- WooCommerce – works like magic when it comes to selling products on your website or a full online shop.
- MailPoet – Mailing list program—I use it on my other blogs.
- Jetpack Boost – A version of Jetpack in case the only features you need are speed and performance improvement.
- Jetpack CRM – Works well with WooCommerce in dealing with customer communication and interaction.
Ever since I started using Jetpack, I haven’t had any hiccups. Furthermore, I use the Jetpack mobile app heavily to manage all my sites. If it wasn’t for Jetpack, I can only imagine how difficult working on mobile would have been. (Yes, I’ve typed almost half of this post on my phone!)
